The hot weather had inspired me to make ice cream with my 3 year old twins, and the flavor I was craving was "dreamsicle". Orange and cream!
Surprisingly, there are many variations of the recipe. I picked a simple and straight forward one:
http://www.joyofbaking.com/OrangeIceCream.html
Tons of fat, but nothing too scary. The resulting orange ice cream was tasty enough, but I think I want to find another recipe with more "wow"!
Just found these:
1) This seems promising: http://cookingwithmichele.com/2011/07/beating-the-heat-creamsicle-ice-cream/
2) Hmmmm sweet condensed milk! http://www.ohsweetjoy.com/2012/07/i-scream-you-scream-series-dreamsicle.html
Showing posts with label like. Show all posts
Showing posts with label like. Show all posts
Tuesday, July 24, 2012
Monday, December 19, 2011
Peppermint Crunch Bark
Another one of my favorite sources of recipes is the King Arthur Flour website. I also enjoy looking at their catalog and drool over all the fancy ingredients and kitchen gadgets.
The Peppermint Crunch Bark recipe was very easy. Basically, melt dark chocolate, pour, wait, melt white chocolate, pour on top of dark chocolate and sprinkle crushed candy canes. However, the tricky part was the timing, which was not described in detail in the recipe. My timing wasn't quite right and half of the bark separated into white chocolate and dark chocolate.
After a few more tries, this peppermint crunch bark recipe could potentially be a keeper for my annual Christmas treat ensemble. It is tasty and very pretty to look at.
Sunday, December 18, 2011
Soft Pretzel

I got a free vegan cookbook recently and my 2.5 year old girls found a recipe for pretzels and demanded that I make them. Sure, why not, sounds like fun to me! Except that I don't really trust a vegan recipe so I go back to my favorite Cooks Illustrated!
The dough part was very straight forward, similar to making bread. The most challenging part was shaping the dough. It was a very tight one and it shrunk while sitting on the baking sheet. At the end the pretzels looked like little piles of poop. Regardless of the shape, the pretzels were very tasty while they were fresh and it was very easy to make multiple toppings since these were added at the last moment. The four flavors we had were:
Cheddar
Kosher salt
butter
cinnamon sugar
I will definitely make these pretzels again and again. Maybe in different shapes though.
Thursday, November 10, 2011
Penne Alla Vodka
It might be the drop in temperature that awakened my carb-cravings. I have been thinking about penne alla vodka for days and finally I got all the ingredients.
There were several versions of this dish in Cooks Illustrated but I went straight to the "Penne Alla Vodka" recipe. Another day I might try other versions. Although it took me several attempts to acquire all the ingredients, it really was a simple recipe that involves mostly kitchen stables such as whole peel tomato, tomato paste, onion, garlic, heavy cream, basil, onion, garlic and chili pepper. Oh wait, and some high quality vodka.
The result was amazing. Given the simplicity of the recipe, I wasn't expecting much, but WOW, it was tasty! My girls even thought it was their beloved baked ziti. Now why would I go through all the trouble and calories to make baked ziti if I can spend 30 minutes for a tasty and hearty penne alla vodka! I highly recommend this recipe!
Now that I have my very first bottle of vodka, what should I do! I am seeing apple pie with a special dough involving vodka!
Friday, September 23, 2011
Crepe with Ricotta, Ham and Spinach Filling
Friday is our "Breakfast for Dinner" day. I was inspired by the video on the Cooks Illustrated website and decided to make crepes.
The ingredients required for the savory crepe were very simple: egg, flour, butter, milk, water and salt. The only thing to keep in mind was that the batter needed to be refrigerated for 2 hours prior to cooking. Using the technique shown on the video, the crepes came out beautifully golden and thin. None of the crepes ripped when stacked on a plate.
The ricotta, ham and spinach filling was also very simple to make. I sauteed fresh spinach leaves (instead of using frozen spinach) after cooking the onion and garlic and it worked well.
I wasn't quite sure how to fold the crepes since the instruction only said "fold as desired". The first crepe was folded in fourth but it looked very thick. After trying a few different ways, I preferred to stack the fillings with additional layers of crepe and tuck in the sides. (Sorry no pictures. Maybe next time!)
One little confusing point on the Cooks Illustrated recipe: the recipe in the crepe video was not the one shown in text. Both the sweet and savory crepe recipes required refrigeration for 2 hours whereas the video said the batter didn't need to be refrigerated.
Overall I liked the recipe and I would definitely do this again with all sorts of fillings. In fact, we put homemade strawberry jam in the extra savory crepe and it was delicious! There was a recipe for sweet crepes, but I think the savory flavor nicely complemented the sweetness of the jam.
Friday, August 12, 2011
Creamy Mexican Pudding
I came across this recipe from Cooks Illustrated when I was making the beef stew. In general I love "Mexican Chocolate" anything.
The recipe involved many ingredients but was very easy to make. Two things I did differently: 1)I accidentally used semi sweet chocolate instead of bitter sweet, 2) I didn't strain the pudding before chilling because it was already 11pm at night.
The pudding turned out rich and spicy but I think it would have been even better had I used the right chocolate. I guess I need to do this again soon!
Thursday, August 11, 2011
Beef Stew

When I bought the fancy kobe style beef from a Japanese store I was just going to make a simple beef soup for my girls. Then I realized that I didn't really know how to make a tasty beef stew. Of course I went straight to Cooks Illustrated and found this "Best Beef Stew" recipe.
Here's my modified ingredient list:
American Kobe style beef
1/2 onion, sliced
1 carrot, chunk
tomato paste + minced garlic
Port
Chicken broth
1 Bay leaf
Dried thyme
Potato
Frozen sweet peas
Israeli couscous
Mainly, I am missing the anchovy, salted pork, pearl onions and the gelatin part. I followed closely the cooking time indicated in the recipe except for the potato part since I was running late.
The stew was served with Israeli couscous which was cooked in chicken broth. It was delicious and hearty. The stew was thick enough that I didn't feel the need to do the gelatin step. One day I'd like to try this recipe again with all the secret ingredients and maybe serve it with homemade spatzle.
Monday, July 25, 2011
Healthy Pasta Sauce
One of my cousin brought her "homemade" spaghetti to my huge BBQ event back in June. It was different from the regular spaghetti and meat sauce we have normally and it was nostalgic. It reminded me the flavor of "Italian pasta" back when I was a kid in Taiwan.
I tried to replicate my cousin's recipe with some convenient modifications:
Diced Onion
1 Clove of garlic, minced
4 tomatoes, skin removed, seeded and finely diced
6 oz grounded Berkshire pork
1 medium carrot
Half zucchini
Soy sauce
Sugar
Rice wine
Black pepper and salt
Red pepper flakes
Parmesan cheese
Milk
1 Bay leaf
Cooked pasta
1) Marinade grounded pork with soy sauce, rice wine and sugar for ~ 30 minutes
2) Brown pork in a pot and separate into small chunks. Remove pork from the pot.
3) Using the oil from pork to saute onion over medium high heat until translucent. Sautee carrots and zucchini until lightly browned.
4) Add diced tomato and bay leaf into the saute vegetable mix. Bring to a boil and simmer for ~ 20 minutes.
5) Add browned pork to the tomato sauce, bring to a boil and simmer for 20-30 minutes
6) Test the sauce and season with salt, red pepper flakes and Parmesan cheese. If the sauce is too acidic, add milk
7) Add sauce to cooked and strained pasta and season again.
Since I don't put in much dry herbs, the fresh vegetable flavor is much more apparent. There is a whole lot of chopping compared to the canned tomato recipes, but it's worth all the work. The result is tasty, healthy and just the way I like it.
Tuesday, May 17, 2011
Pani Popo Samoan Coconut Buns

I love getting newsletters from the King Arthur Flour Company, especially when they come with bread recipes.
The online recipe for Pani Popo could probably use a bit more details, but the blog version has some helpful illustrations.
Here are some modifications I made:
1. 1 cup of warmed whole milk was used instead of water and dry milk. First I dissolved the instant yeast in a small amount (~3 tbs) of warm water and added to warm milk. Then I added the yeast mixture to the rest of the dough ingredients.
2. I am not sure if I used 3.5 cups of flour or 4 cups. Somehow I had trouble counting to 7 (with 1/2 cup each). The batter was very wet after kneading, so I added another 1/2 cup of flour assuming that I didn't count right to begin with.
3. Melted butter was left out from the dough... saw the butter in the microwave hours later. Ooops!
4. Coconut milk was used instead of water and coconut milk powder.
5. The buns were baked for approximately 24 minutes.
I must have had lots on my mind to have so many mess ups, but the end result was pretty and tasty. Having left out that 4 tablespoons of butter, I convinced myself that it was ok to eat another bun right before bedtime.
This coconut bun would be a fabulous breakfast or brunch item if some rising steps can be done overnight. More experiments on the way, with butter included.
Wednesday, April 27, 2011
Spaetzle
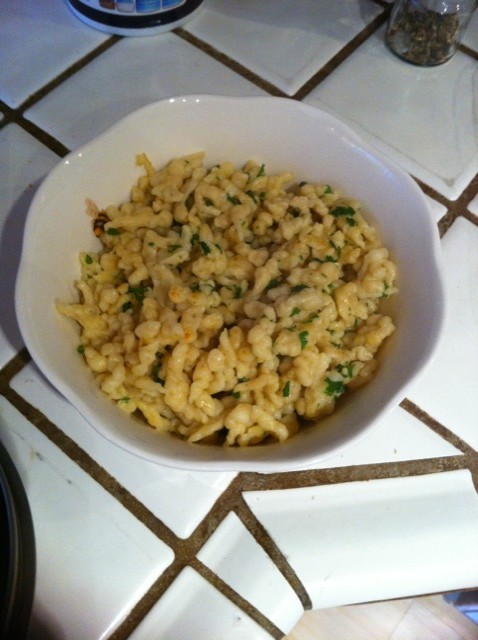
I had the strongest craving for dough today.... sent husband to pick up Chinese dumplings on the way home and I started making spaetzle. My original plan was to follow the recipe from the Smitten Kitchen; however, I did not have 7 eggs. I consulted three sources: the Smitten Kitchen, the Cooks Illustrated and the City Tavern Cookbook. I decided to try my most trusted Cooks Illustrated recipe for spaetzle, followed by the chilling step and saute instruction from the Smitten Kitchen after seeing that the City Tavern Cookbook took similar steps too.
Note: The Cooks Illustrated recipe said to put boiled spaetzle into a warmed and butter bowl whereas the other two sources instructed to put cooked spaetzle in an ice bath and tossed with oil.
Here's what I did:
1) Mixed the ingredients for the batter and let it sit for 10 minutes
2) Prepared an ice bath and a bowl with a small amount of olive oil
3) Scraped a small amount of the batter through a colander using a hard spatula into a boiling pot of water (lightly salted)
4) Took out the floating spaetzle and dunked into an ice bath, followed by a light toss in the oiled bowl
5) Melted a small amount of butter in a pan and saute the spaetzle until lightly golden. Sprinkled with chopped parsley
The process of scraping the batter through a colander was very labor intensive. I was not sure if everything was done right, but the consistency of the batter was very stretchy. It was hard enough moving the batter from one bowl to another, let alone pushing it through little holes to form little long strings of noodles. Fortunately, the spaetzle turned out great. I loved the nutmeg flavor in the spaetzle and the texture was awesome. The husband loved it.
So, I've already order me a spaetzle maker and will definitely make spaetzle again. It would be so cool if I could make spaetzle the good old fashion way, but I think I will spend my time looking for good sauces to go with the spaetzle.
Tuesday, April 19, 2011
Easter Egg Treats

The recipe came from the Rice Krispies website. It was my first time shaping rice crispy treats into non-rectangular shapes and it was surprisingly easy! I decided not to decorate these eggs with additional frosting and candies since these were made for 2-3 year olds, but think of the endless possibilities!
Thursday, February 24, 2011
Couscous
On a quest to find new food options for my girls, I tried two couscous recipes from Cooks Illustrated. Couscous is one of the most nutritious grain product. It is made from semolina durum wheat and is high in vitamin B's and low in fat content.
Couscous with carrots, raisin (and pine nuts)
This one is very tasty and refreshing (from orange). The actual recipe contains pine nuts but since I don't usually have pine nuts in my kitchen and the girls don't really care for nuts, I am skipping it for now. The recipe is very simple and the only labor intensive part is the carrot grating and herb chopping. There's a lot of room for adjustment for personal taste. I like to double the raisins and add more orange juice.

Aromatic curried couscous for two
I don't love this one as much as the one above. The smell of curry was everywhere in my home except in the couscous. Perhaps this has something to do with the curry powder I had, but the end product was very boring. This dish is more suitable as a side dish, but not good enough to be a stand alone main dish.
Wednesday, February 23, 2011
Shortbread Cookies

I am not a big believer in Valentine's day, but this year I got all excited about making cute little pink cookies for my twin girls who are almost 2 years old.
Just to show you how much I don't care for heart shape things, I actually had to buy a set of heart cookie cutters for this. Of course, all the normal metal single heart cookie cutters were sold out at Sur La Table the weekend before Valentine's day, so I ended up with a set of plastic cutters made by Cuisipro.
As much I love making cookies, cut-out cookies are not my favorites. They take too much time and are not all that tasty. Excessive food coloring and sugar used for the decoration are also big turn-off for me too. Somehow I stumbled upon the "Best Shortbread" recipe from Cooks Illustrated. It wasn't meant for cut-out cookies, but the dough was simple to prepare and very easy to cut. I love it!
I followed the baking temperatures and timing instructed in the recipe even though my cookies were much smaller than the pie form described. For thinner cookies, the baking time can be decreased to prevent too much browning. I baked the first batch in its natural color and added red gel food coloring to the second half of the dough. Both worked well and produced very flaky and buttery cookies. The dough withstood my multiple rolling and shaping and it stored well in the fridge for a few days. Perhaps the very first batch was the best, but the subsequent "worked" batches were pretty tasty still.
This recipe is really awesome. I love not only that neat ingredients (oatmeal and corn starch) were added to improve taste and texture, but these items are usually available in any pantry!
Strawberry Cupcakes
We are so lucky to live in California where we can get good strawberries most of the year. These attractive, aromatic, bright red beauties always make me buy more than I need for the week at the farmers market. A strawberry vendor once suggested that I store the unwashed strawberries in air-tight containers lined with paper towels. It actually works, but often I have more strawberries than I know what to do with.
A friend suggested the Sprinkles' Strawberry Cupcake Recipe posted on Martha Stewart's website. I adore those crafty things Martha comes up with, but I am not so sure about food items. This one is a keeper though. The ingredients are usually readily available in my kitchen and the recipe is easy. My girls, their daddy, and our real estate agent love these cupcakes!
For the next strawberry season I have a plan. I am going to make jam! Stay tuned.
Other Recipes I Tried From Cooks Illustrated
Maybe I will write up more detailed reports later, but for now, here is the list.
Recipes I liked from Cooks Illustrated
Baked ziti
Black bean soup
The Best banana bread
Corn muffins
Curried egg salad
Hummus
Monkey bread
Penne and chickpea soup
Silky butternut squash soup
Sweet potato oven fries
Roasted green bean and potato salad with radicchio- I like the recipe for roasted potato
Recipes I didn't like from Cooks Illustrated
Indian-style curry with potatos, cauliflower, peas and chickpeas
Thai chicken soup- maybe substitute with a low fat coconut milk
Quiche Crust
On a quest for better "pizza crust" for my babies, I tried a Quiche Lorraine crust recipe from Cooks Illustrated. The ingredients are simple (flour, butter, shortening, sugar, salt and iced water) and the instruction was easy.
The resulting crust was awesome. Very flaky and has a very nice, balanced flavor. It was a savory crust with a little hint of sweetness. This is not only great for a quiche, it can be used as little tarts for hor devours.
The resulting crust was awesome. Very flaky and has a very nice, balanced flavor. It was a savory crust with a little hint of sweetness. This is not only great for a quiche, it can be used as little tarts for hor devours.
Subscribe to:
Posts (Atom)